A small bathroom doesn’t have to feel like a compromise. With the right plan, even the tightest spaces can become functional, stylish rooms that punch well above their square footage. But figuring out how to remodel a small bathroom, from layout decisions to material choices to budget, can feel like solving a puzzle with too many pieces. That’s exactly why we put this guide together.
At Turning Point Ventures, we’ve handled dozens of bathroom renovations across Western Washington, and small bathrooms are some of the most rewarding projects we take on. The constraints force creative solutions, and the results tend to surprise homeowners who assumed their space was “too small” to improve. We’ve seen firsthand what works, what eats up budgets unnecessarily, and where smart choices make the biggest difference.
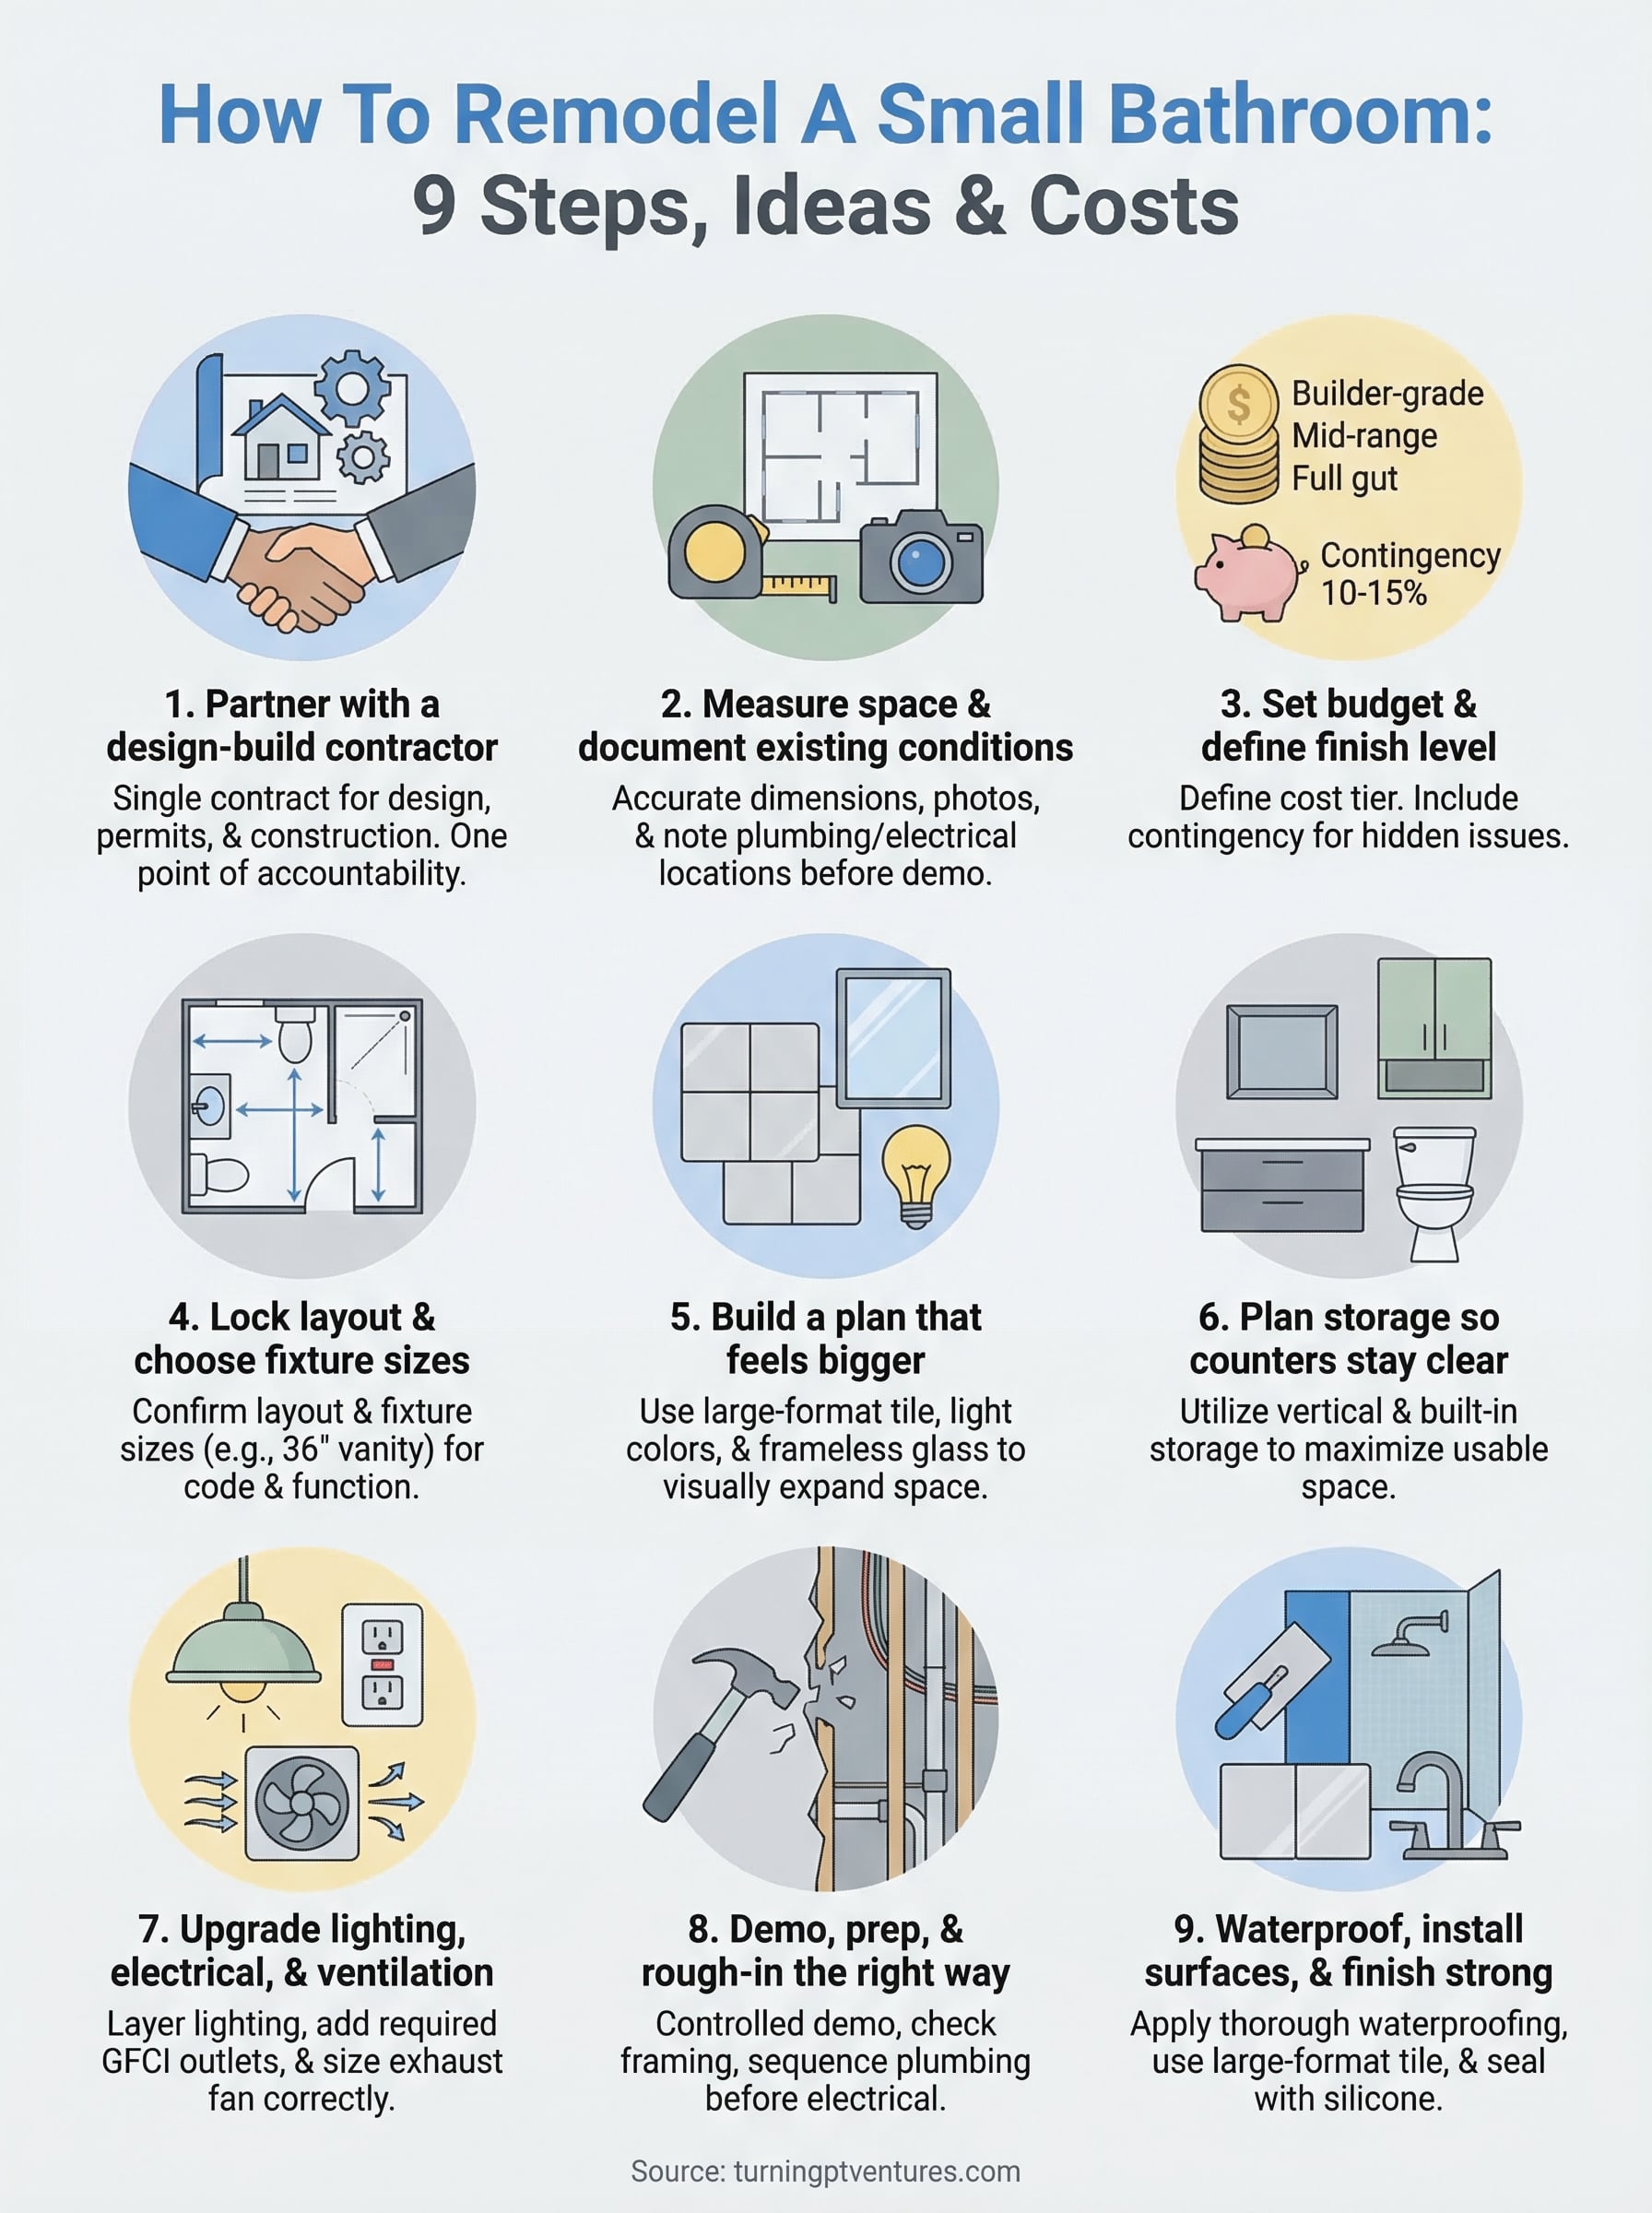
Below, we’ll walk you through 9 clear steps to plan and complete your small bathroom remodel, along with design ideas that maximize every inch and realistic cost breakdowns so you know what to expect before demo day. Whether you’re doing the research to hire a contractor or considering a DIY approach, this is the roadmap.
1. Partner with a design-build general contractor
The first decision you make when figuring out how to remodel a small bathroom sets the tone for everything that follows. Hiring a design-build general contractor means one team handles your design, permits, subcontractors, and construction under a single contract, so you never manage multiple vendors or chase down separate bids.
What you get when one team runs the whole remodel
A design-build contractor gives you a single point of accountability from the first sketch to the final coat of paint. The designer and builder work together from day one, which means layout decisions account for structural realities before you spend money on plans that won’t work in the field. You also get faster decision-making because the same team that resolves a tile conflict is the same team that ordered the tile.
When one team owns both the design and the build, miscommunications between designers and contractors stop being your problem to solve.
Questions to ask before you sign a contract
Before you commit, ask the contractor for references from recent bathroom projects and request photos or a visit to a completed job. You also want to confirm they carry general liability insurance and workers’ comp, pull permits in your municipality, and have licensed plumbers and electricians on their team.
Bring these questions to the conversation:
- How do you handle scope changes mid-project?
- Who is my main point of contact day to day?
- What is your current project load and estimated start date?
- How do you manage subcontractors on the job site?
Typical cost structure and how payments work
Most contractors structure payments as a deposit at signing, followed by draws tied to project milestones like rough-in completion and tile installation. Avoid any contractor who demands more than 30% upfront before work begins. The remaining balance typically splits across two to three milestone payments, with a final draw at punch-list completion.
When this step saves the most time and money
A design-build contractor saves you the most on small bathroom remodels where plumbing moves, electrical upgrades, and layout changes overlap. Coordinating those trades yourself multiplies scheduling risk. When a single contractor owns the schedule, delays in one trade get handled internally rather than sitting in your inbox to solve.
This step is most valuable early. Locking in a contractor before you’ve finalized any decisions means you get professional input that shapes your budget realistically from the start.
2. Measure the space and document what you have
Before any materials get ordered or layouts get finalized, you need accurate dimensions and a thorough record of what currently exists. Skipping this step is one of the most common reasons knowing how to remodel a small bathroom still leads to costly mid-project surprises.
Measurements that drive every decision
Pull measurements for floor-to-ceiling height, wall-to-wall width and depth, door swing radius, window placement, and the exact position of existing plumbing rough-ins. Record everything on a simple hand-drawn floor plan so every trade works from the same numbers. Even a two-inch error can eliminate a fixture option or force a plumbing relocation.
Key dimensions to capture:
- Rough-in distance from the wall to the toilet drain center
- Distance between the tub or shower drain and supply lines
- Window sill height and rough opening size
- Ceiling height at the lowest point (especially in attic-adjacent baths)
Accurate measurements taken before demo save more money than almost any other single preparation step.
Photos and notes to take before you demo anything
Photograph every wall, ceiling, and floor surface from multiple angles before a single tile comes off. Note shut-off valve locations, load-bearing wall positions if structural changes are planned, and current outlet and switch placement. These records protect you if a dispute arises and guide every contractor who enters the job.
Red flags to look for behind walls and under floors
Look for soft spots in the subfloor, discoloration near the tub or shower surround, and rust staining under fixtures. These signal water damage that needs repair before new materials go in.
Cost range for inspections and diagnostic work
A moisture inspection or plumbing assessment typically runs $150 to $400. If a contractor suspects hidden damage, budget an additional $300 to $700 for exploratory wall openings.
3. Set your budget and define the finish level
Knowing how to remodel a small bathroom means knowing your numbers before you pick a single tile. Your finish level and scope drive every material and labor cost in the project, so locking in a realistic budget early prevents the painful re-scoping conversations that happen mid-demo.
The three cost tiers most small baths fall into
Most small bathroom remodels land in one of three ranges. Builder-grade finishes with minimal layout changes typically run $8,000 to $15,000. Mid-range projects with quality tile, a custom vanity, and minor plumbing moves land between $15,000 and $25,000. Full gut renovations with premium fixtures and layout changes push $25,000 to $40,000 or more.
Where small bathroom budgets usually blow up
The two biggest budget breakers are hidden water damage and scope creep. When you open walls and find rotted framing or failed waterproofing, repair costs stack fast. Scope creep happens when you add upgrades after the contract is signed, and those changes carry full labor markups at a point when stopping is not practical.
Decide your finish level before demo starts. Changing your mind mid-project costs two to three times more than deciding upfront.
How much contingency to set aside and why
Set aside 10 to 15 percent of your total budget as a contingency. Older homes in Western Washington frequently reveal moisture issues or outdated plumbing once walls open, and that buffer keeps the project moving without derailing your finances.
Sample budget breakdown by category
Use this as a starting reference when you build your project estimate. Actual percentages shift depending on your finish level and whether plumbing moves.
| Category | Typical Share |
|---|---|
| Labor | 40-50% |
| Tile and flooring | 15-20% |
| Fixtures and hardware | 15-20% |
| Vanity and storage | 10-15% |
| Permits and inspections | 3-5% |
| Contingency | 10-15% |
4. Lock the layout and choose fixture sizes
Once you know your budget and finish level, locking the layout is the most consequential structural decision you’ll make when figuring out how to remodel a small bathroom. Every fixture position, storage choice, and finish selection depends on where your plumbing and walls land, so confirm the layout before you order a single material.
Layout rules of thumb for tight clearances
Small bathrooms follow minimum clearance codes that you can’t design around. The toilet needs at least 15 inches from its center to any side wall or obstruction, and 21 inches of clear floor space in front of it. A vanity requires a minimum 21-inch approach depth, and the shower must provide at least 36 by 36 inches of interior space to meet code.
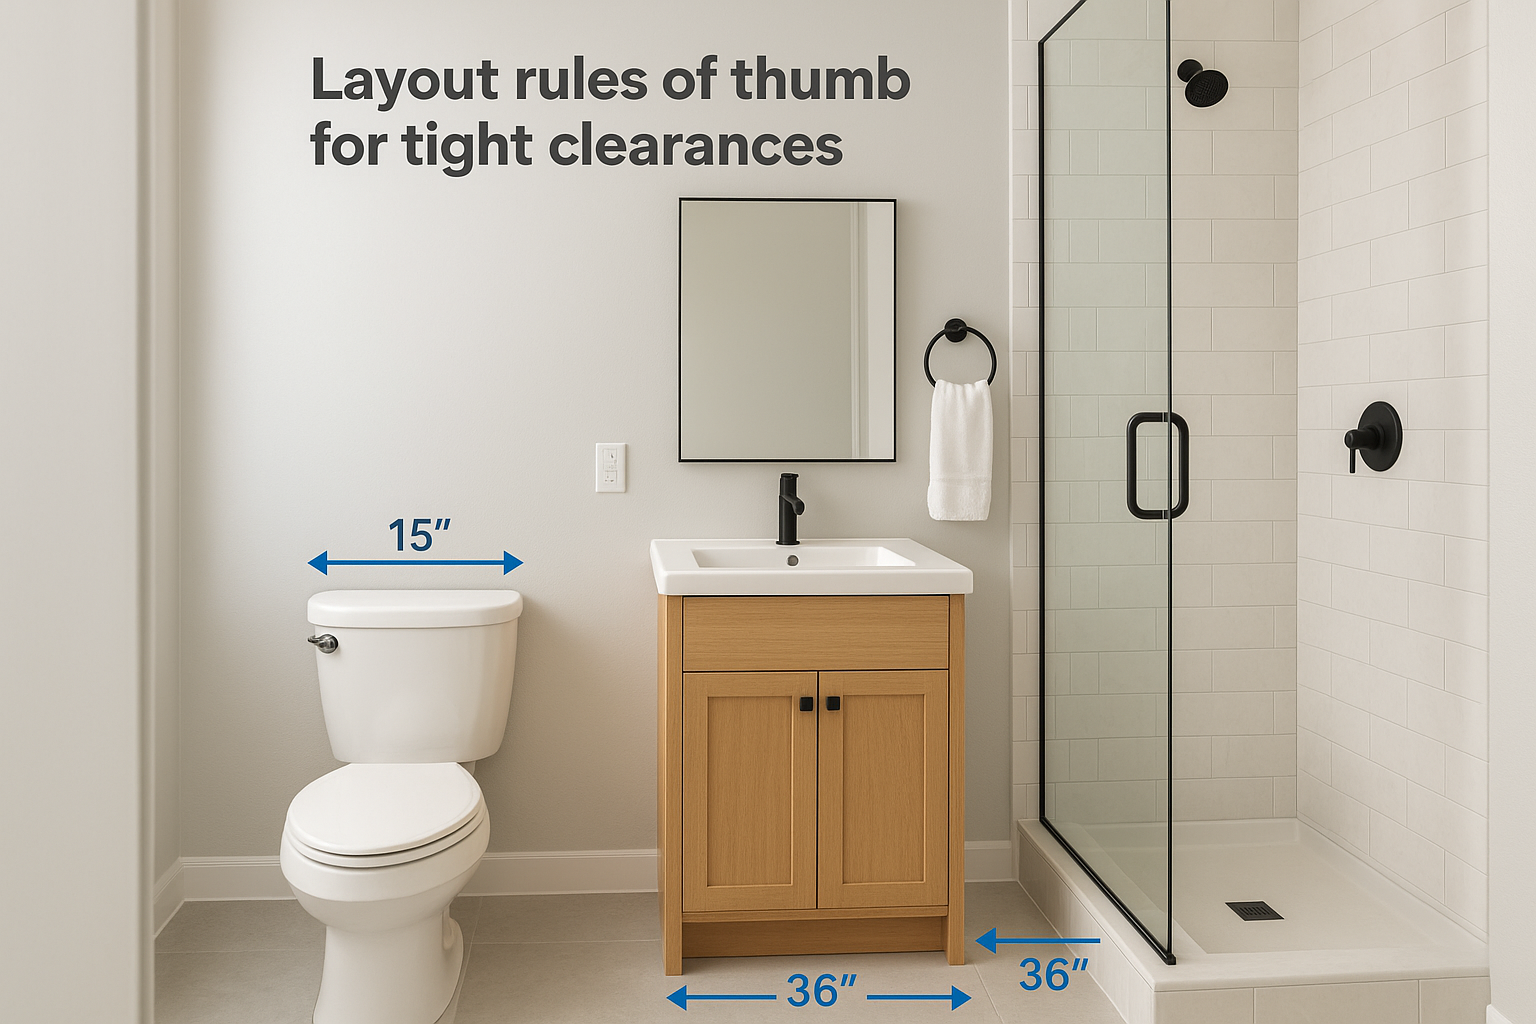
Designing around minimum clearances protects your permit approval and makes the finished room usable, not just passable on paper.
Shower, tub, toilet, and vanity sizing that actually fits
In tight spaces, a 36-inch single vanity almost always works better than a double. A walk-in shower with a linear drain and no curb opens up the visual floor area and removes the step-over that makes small baths feel cramped. Avoid oversized soaking tubs in rooms under 50 square feet.
Door and shower entry options that free up floor space
A pocket door or barn-style sliding door eliminates the swing radius that cuts into usable floor space. Frameless shower glass with a hinged or sliding entry keeps sightlines open without adding visual bulk to the room.
Cost impact of moving plumbing and electrical
Moving a toilet or shifting drain locations adds $500 to $2,000 in rough plumbing labor alone. Relocating supply lines or upgrading to a larger drain stack can push those costs higher, so limit plumbing moves unless the layout genuinely requires them.
5. Build a plan that makes the room feel bigger
Surface choices carry more weight in a small bathroom than in any other room in the house. When you figure out how to remodel a small bathroom, visual expansion through materials and finishes is one of the most cost-effective strategies available, and the decisions you make here affect the room’s feel long after the project wraps.
Tile, grout, and pattern choices that expand the space
Large-format tiles, typically 12×24 inches or bigger, reduce the number of grout lines on the floor and walls, which makes surfaces read as continuous rather than segmented. Running floor tile on a diagonal or in a straight horizontal pattern from the doorway draws the eye deeper into the room and adds perceived length. Match your grout color closely to the tile to eliminate visual breaks.
Fewer grout lines mean fewer interruptions, and fewer interruptions make a small room feel larger.
Color, sheen, and paint selections that bounce light
Light, cool-toned neutrals like soft white, pale gray, and warm beige reflect more light than darker colors and push walls back visually. Use a semi-gloss or satin sheen on walls to increase light bounce without looking too commercial.
Glass and mirror strategies that open sightlines
A frameless glass shower enclosure keeps sightlines unobstructed from the door to the back wall, which is one of the single biggest visual upgrades in a tight bathroom. Extend your mirror horizontally across the full vanity width to double the reflected light and add perceived width.
Costs for finishes that deliver the biggest visual payoff
Large-format tile typically runs $3 to $8 per square foot for materials, with installation adding $10 to $15 per square foot. A full-width vanity mirror costs $150 to $400, and frameless glass shower panels range from $900 to $2,500 installed depending on size.
6. Plan storage so counters stay clear
One of the most overlooked parts of figuring out how to remodel a small bathroom is storage planning. When counters stay clear, the room feels larger and functions better every day. Every inch of vertical and wall space is a storage opportunity if you plan for it before the walls close.
Vanity styles that save space and improve flow
A floating vanity mounted 16 to 18 inches off the floor exposes the floor beneath it, which stretches the visual depth of the room. Choose a model with integrated drawers rather than open shelving to keep toiletries out of sight and leave the counter surface clear and usable.
Recessed niches, medicine cabinets, and wall storage
Recessed niches built between studs during rough-in add 4 inches of depth without stealing any floor space. A recessed medicine cabinet above the vanity handles daily-use items and eliminates a countertop organizer entirely.
Building storage into the walls during rough-in costs far less than retrofitting it after tile is set.
Over-toilet and vertical storage that looks intentional
Over-toilet shelving or a built-in cabinet turns dead wall space above the toilet into functional storage. Keep the finish consistent with your vanity so the addition reads as a deliberate design element rather than an afterthought.
Cost range for storage upgrades and custom carpentry
A recessed shower niche adds $150 to $400 in labor and materials. A recessed medicine cabinet runs $200 to $600 installed. Custom built-in cabinetry around the toilet or vanity typically costs $800 to $2,000 depending on size and finish level.
7. Upgrade lighting, electrical, and ventilation
When you figure out how to remodel a small bathroom, lighting and ventilation are two areas most homeowners underestimate until the project is done and the room still feels dim or steamy. Getting these systems right during rough-in costs far less than fixing them after tile is set.
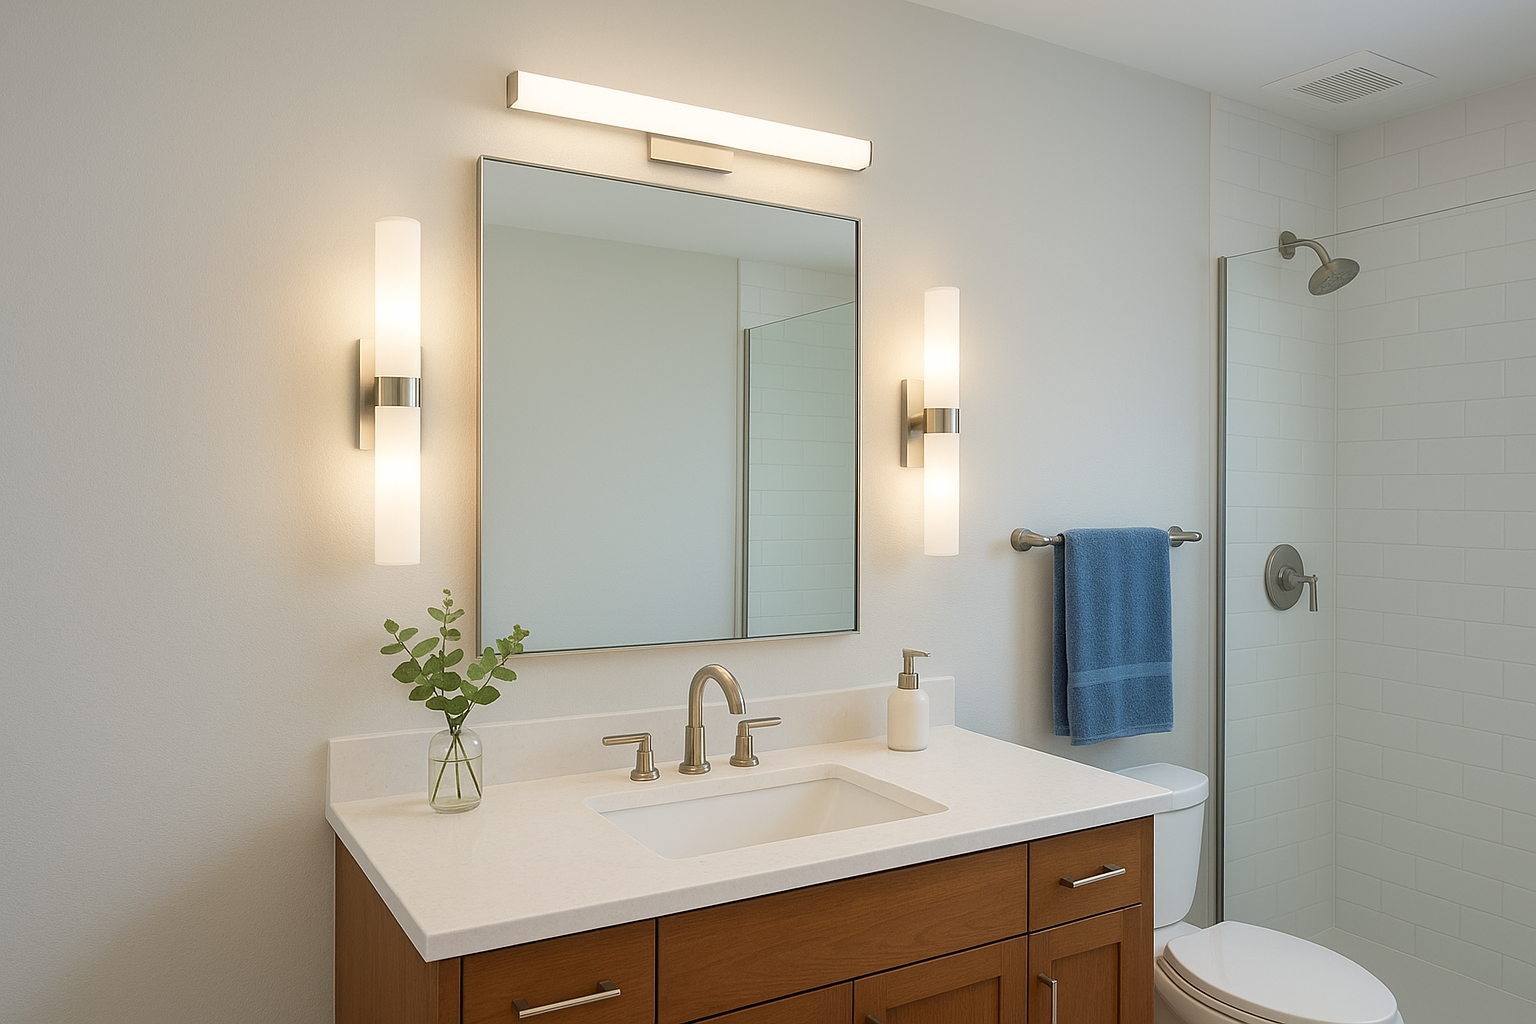
Lighting layers for a brighter, larger-feeling bathroom
A well-lit small bathroom uses at least two lighting layers: overhead ambient light and task lighting at the vanity mirror. Recessed ceiling lights with a high CRI rating (90+) render colors accurately and make the room feel cleaner and larger. Add sconces or a linear fixture at mirror height to eliminate facial shadows that a single overhead fixture always creates.
Outlet placement, GFCI, and code-driven requirements
All outlets within 6 feet of a water source require GFCI protection per the National Electrical Code. Place outlets at counter height near the vanity and confirm your panel has capacity for any new circuits the project adds, especially if you’re adding heated floors or a higher-wattage exhaust fan.
Your electrician should pull permits for all new circuits, not just the fixture swaps.
Exhaust fan sizing, ducting, and moisture control
Size your exhaust fan to at least 1 CFM per square foot of bathroom floor space, and duct it directly to the exterior rather than into the attic. A fan with a built-in humidity sensor runs automatically when moisture builds and shuts off once the air clears.
Typical costs for electrical and ventilation work
Electrical rough-in for a small bathroom typically runs $400 to $900. A quality exhaust fan installed with proper exterior ducting costs $200 to $600 depending on fan grade and duct run length.
8. Demo, prep, and rough-in the right way
When you figure out how to remodel a small bathroom, the demo and prep phase sets the quality ceiling for everything that follows. Rushing through this stage or skipping diagnostic steps during rough-in leads to finish failures you won’t discover until tile is already set.
Demolition approach that avoids costly surprises
Start demo by shutting off water and electrical circuits to the bathroom before any tool touches a surface. Remove fixtures before tile, and score grout lines carefully to protect cement board or drywall that can stay. Systematic removal protects your subfloor from impact damage that adds labor hours you didn’t budget.
Controlled demolition costs less to execute than fixing what rushed demolition breaks.
Framing fixes that make small baths function better
Once walls open, check every stud and joist for rot, moisture damage, or improper notching from previous plumbing runs. Sistering a compromised stud and blocking between joists under the toilet or shower pan adds structural stability that protects your finish materials for years after the project closes.
Rough plumbing and rough electrical sequencing
Rough plumbing goes in before rough electrical because plumbers need clear access to drill through framing without working around wire runs. Confirm drain slope, vent stack connections, and supply line placement with your plumber before the electrician schedules their rough-in visit.
Cost range for labor-heavy prep work
Demolition labor for a small bathroom typically runs $500 to $1,200. Framing repairs add $300 to $800, and rough-in plumbing and electrical combined generally costs $1,500 to $3,500 depending on the scope of changes.
9. Waterproof, install surfaces, and finish strong
The final phase of how to remodel a small bathroom is where every earlier decision becomes visible. Rushing through waterproofing, tile, or finishes to reach the finish line produces failures that surface months later and cost far more to fix than getting it right the first time.
Waterproofing methods that prevent future failures
Apply a sheet membrane or liquid-applied waterproofing system over all cement board surfaces in the shower and tub surround before any tile goes up. Focus extra attention on corners, seams, and floor-to-wall transitions, which are the most common points where water finds a path into the framing.
Waterproofing done well is invisible, but skipping it produces damage you’ll see in the ceiling below within a year.
Tile and flooring install decisions that affect longevity
Use a large-format tile with a rectified edge for cleaner, narrower grout joints that resist staining and cracking. Set floor tile with a latex-modified thinset mortar to handle the minor deflection that wood-frame subfloors experience over time.
Fixture install, caulk, trim, and paint priorities
Install fixtures only after all tile and flooring are fully cured, typically 24 to 48 hours after grouting. Use 100 percent silicone caulk at all tile-to-fixture transitions and corner joints where grout would eventually crack under movement.
Final walkthrough, punch list, and maintenance basics
Walk the finished room with your contractor and document every incomplete or deficient item on a written punch list before you release the final payment. Re-caulk silicone joints annually to prevent moisture infiltration and extend the life of your new surfaces.
What to do next
You now have a complete picture of how to remodel a small bathroom, from hiring the right contractor to waterproofing the final tile joints. Each step builds on the one before it, and skipping any of them is where projects stall or go over budget. The good news is that small bathrooms reward careful planning more than almost any other renovation in the house.
Turning that plan into a finished room takes a team that handles every phase without handing problems back to you. At Turning Point Ventures, we manage design, permits, subcontractors, and construction as a single integrated process so your project moves forward on schedule. If you’re ready to stop planning and start building, reach out to our team to get your small bathroom remodel started. We’ll walk you through realistic costs and a clear timeline based on your specific space and goals.


0 Comments