A kitchen remodel is one of the most rewarding upgrades you can make to your home, and one of the easiest to get wrong. Between choosing materials, setting a realistic budget, and figuring out the right sequence of work, there are dozens of decisions that can either save you thousands or cost you months of frustration. Knowing how to plan a kitchen remodel before swinging a single hammer is the difference between a project that runs smoothly and one that spirals into costly change orders and delays.
At Turning Point Ventures, we’ve guided homeowners across Western Washington through full-scale kitchen renovations, and we’ve seen firsthand what happens when planning gets skipped or rushed. The clients who end up happiest, and closest to their original budget, are the ones who invested real time in the planning phase. That’s not a sales pitch. It’s a pattern we see on every single project.
This guide walks you through the entire planning process step by step: setting a budget that actually holds up, building a realistic timeline, choosing a layout that works for your household, and understanding the correct order of operations so nothing gets ripped out twice. Whether you’re managing the project yourself or working with a general contractor, this is the roadmap you need before demo day. Let’s get into the details that matter.
Before you start: scope, style, and constraints
Before you dive into the specific steps of how to plan a kitchen remodel, you need to get honest about three things: what the project includes, what aesthetic direction you’re heading, and what hard limits you’re working within. Skipping this preliminary work is what turns a six-week remodel into a four-month ordeal. The decisions you make in this stage set the boundaries for every choice that follows, so treat them as foundation work, not optional prep.
Define your project scope
Scope determines whether you’re doing a cosmetic refresh or a full gut renovation, and the gap between those two projects is enormous in both cost and time. A cosmetic update might mean new cabinet doors, fresh paint, and updated hardware, while a full renovation involves moving walls, relocating plumbing, and rewiring electrical circuits. You need to decide upfront which category your project falls into before you talk to a contractor, pull permits, or price out a single material.
Here are the three most common scope levels to help you categorize your project:
- Cosmetic refresh: New paint, hardware, light fixtures, and possibly updated appliance faces. No structural or mechanical changes.
- Mid-range remodel: Full cabinet replacement, new countertops, updated plumbing fixtures, and new flooring. The layout stays the same.
- Full gut renovation: Everything comes out. Walls may move, plumbing and electrical get relocated, and the layout changes completely.
The scope you commit to here will shape every other decision in this guide, so treat it as your first and most important call to make.
Nail down your style direction
Visual direction is not a step you leave until you’re standing in a showroom choosing tile. You need a working style reference before you meet with any contractor or designer. This doesn’t mean a finalized mood board, but you do need to know whether you’re leaning toward clean modern lines, warm farmhouse textures, or a transitional look that blends both.
Pull images from home design publications or manufacturer galleries and identify three to five photos that consistently appeal to you. Look for patterns: Are you drawn to white cabinetry or darker tones? Flat-front doors or shaker style? Quartz counters or butcher block? These patterns reveal your actual preferences faster than any questionnaire, and they give a contractor something concrete to price against rather than a vague description.
Identify your constraints early
Structural and mechanical constraints can eliminate a layout idea fast, so you need to surface them before you fall in love with a plan. Load-bearing walls, existing plumbing stack locations, and electrical panel capacity are all fixed points that limit what’s actually buildable without significant cost additions.
Your three main constraint categories to document before planning begins:
- Structural: Which walls are load-bearing, and where are the floor joists running?
- Mechanical: Where do the gas line, water supply, drain stack, and electrical subpanel currently sit?
- Code and permits: What does your local jurisdiction require for the specific scope of work you’re planning?
Knowing these limits upfront keeps you from designing a kitchen that blows the budget before demo day even arrives.
Step 1. Define goals, needs, and wish list
One of the most overlooked parts of how to plan a kitchen remodel is getting clear on what you actually need versus what you’d love to have. These are not the same list, and treating them as one is a common source of confusion that sends budgets sideways fast. Start by writing down every frustration you have with your current kitchen and every function you wish it performed better. That raw list becomes the foundation for every decision that follows.
If you can’t articulate why you’re remodeling, a contractor can’t build what you actually need.
Separate needs from wants
Your needs are non-negotiable functional requirements: more counter space, better storage, an updated electrical panel to handle modern appliances, or a layout that stops forcing two people to collide at the sink. Your wants are improvements you’d like if the budget allows, such as a kitchen island, a pot-filler faucet, or a custom range hood. Keeping these categories separate protects you when costs run high, because you’ll always know which items to cut first.
Use this template to sort your list before your first planning meeting:
| Category | Item | Priority |
|---|---|---|
| Need | Additional counter space near stove | Must-have |
| Need | Updated electrical for new appliances | Must-have |
| Want | Kitchen island with seating | Nice-to-have |
| Want | Pot-filler faucet | Nice-to-have |
Write down how you actually use the kitchen
Most planning mistakes come from designing around how a kitchen looks rather than how your household uses it daily. Think about how many people cook at the same time, whether you do large batch meal prep, and how often you entertain guests. If two adults cook together every night, a single-corridor galley layout will frustrate both of you regardless of how good the finishes look.
Write out a typical weekday and a typical weekend in your kitchen. Note where you feel cramped, where you waste steps, and where storage consistently falls short. That real-world usage data gives your contractor and designer something specific to solve for, rather than just a style to replicate.
Step 2. Build a realistic remodel budget
Budget is where most kitchen remodel plans fall apart, and the reason is almost always the same: homeowners build a wish list first and assign numbers to it later. That sequence sets you up for sticker shock. A realistic budget starts with cost research, not with finishes, so you know what’s actually achievable before you commit to any specific design direction. Understanding how to plan a kitchen remodel means treating the budget as a design constraint, not an afterthought.

Know your average cost ranges
Labor and materials split differently depending on your scope level, but you need baseline numbers before any contractor conversation. In the Pacific Northwest, a mid-range kitchen remodel typically runs between $40,000 and $80,000, while a full gut renovation with structural changes can climb well past $100,000. Cosmetic refreshes can land in the $10,000 to $20,000 range if you’re keeping layout and mechanicals in place.
Here’s a rough cost breakdown by category to anchor your planning:
| Category | Estimated Share of Total Budget |
|---|---|
| Cabinets and hardware | 30-35% |
| Labor | 20-25% |
| Countertops | 10-15% |
| Appliances | 10-15% |
| Flooring | 5-10% |
| Plumbing and electrical | 5-10% |
| Lighting and fixtures | 3-5% |
These ranges shift based on material quality and project complexity, so use them as a starting framework, not a final quote.
Build in a contingency buffer
Every kitchen remodel uncovers something unexpected once walls open up: outdated wiring, water damage behind cabinets, or subfloor rot that doesn’t show until demo day. A standard contingency is 15 to 20 percent of your total project budget, set aside before you allocate money to any finish or appliance. If you budget $60,000 for the project, keep $9,000 to $12,000 in reserve and plan your visible line items around the remaining amount.
You can track your full budget using this simple template:
| Line Item | Budgeted | Actual | Variance |
|---|---|---|---|
| Cabinets | $18,000 | ||
| Countertops | $7,000 | ||
| Appliances | $8,000 | ||
| Labor | $14,000 | ||
| Contingency (20%) | $9,400 | ||
| Total | $56,400 |
Step 3. Measure and document the existing kitchen
Accurate measurements are the foundation of any solid kitchen layout plan. Many homeowners skip this step or rely on rough estimates, then run into problems when cabinets arrive and don’t fit the space. Understanding how to plan a kitchen remodel properly means capturing every dimension of your current kitchen before you sketch a single layout option. You need the real numbers, not what you think they are.
Measure every surface and opening
Start with the overall room dimensions: length and width from wall to wall at floor level. Then measure ceiling height, window openings (width, height, and distance from the floor), and door openings including swing direction. Capture the location and height of every electrical outlet, switch, and light fixture, and note where the gas line stub-out and water supply lines currently sit.
Use this measurement checklist to make sure nothing gets missed:
- Room width and length (measure at two points each to catch out-of-square walls)
- Ceiling height
- Window width, height, and sill height from floor
- Door width, height, and swing direction
- Distance from each corner to the nearest outlet or switch
- Location of gas stub-out, water supply lines, and drain
- Location of HVAC vents and returns
Missing even one of these dimensions can force a costly redesign after materials are already ordered.
Create a scaled floor plan drawing
Once you have your measurements, transfer them to a scaled drawing on graph paper or a basic drafting tool. Use a scale of 1/4 inch equals 1 foot, which is the standard most contractors and designers work with. Draw the walls, mark all windows and doors, and label the location of every mechanical and electrical element you noted.
Your floor plan doesn’t need to be architect-level precise, but every fixed element must be placed accurately so that cabinet runs, appliance clearances, and traffic paths can all be tested on paper before anything gets ordered. Bring this drawing to every contractor or designer meeting, and update it each time you confirm a change to the plan.
Step 4. Choose a layout that matches how you cook
Your kitchen layout determines how efficient the space feels every single day, and it’s one of the most consequential decisions in how to plan a kitchen remodel. The right layout eliminates wasted steps, keeps the workspace organized, and lets multiple people move without colliding. Before you land on a specific arrangement, you need to understand your options and test them against your actual cooking patterns, not just the square footage of the room.
The six standard kitchen layouts
Every residential kitchen fits into one of six layout categories. Knowing what each one requires in terms of space and traffic flow helps you rule out options quickly and focus on what genuinely fits your footprint.
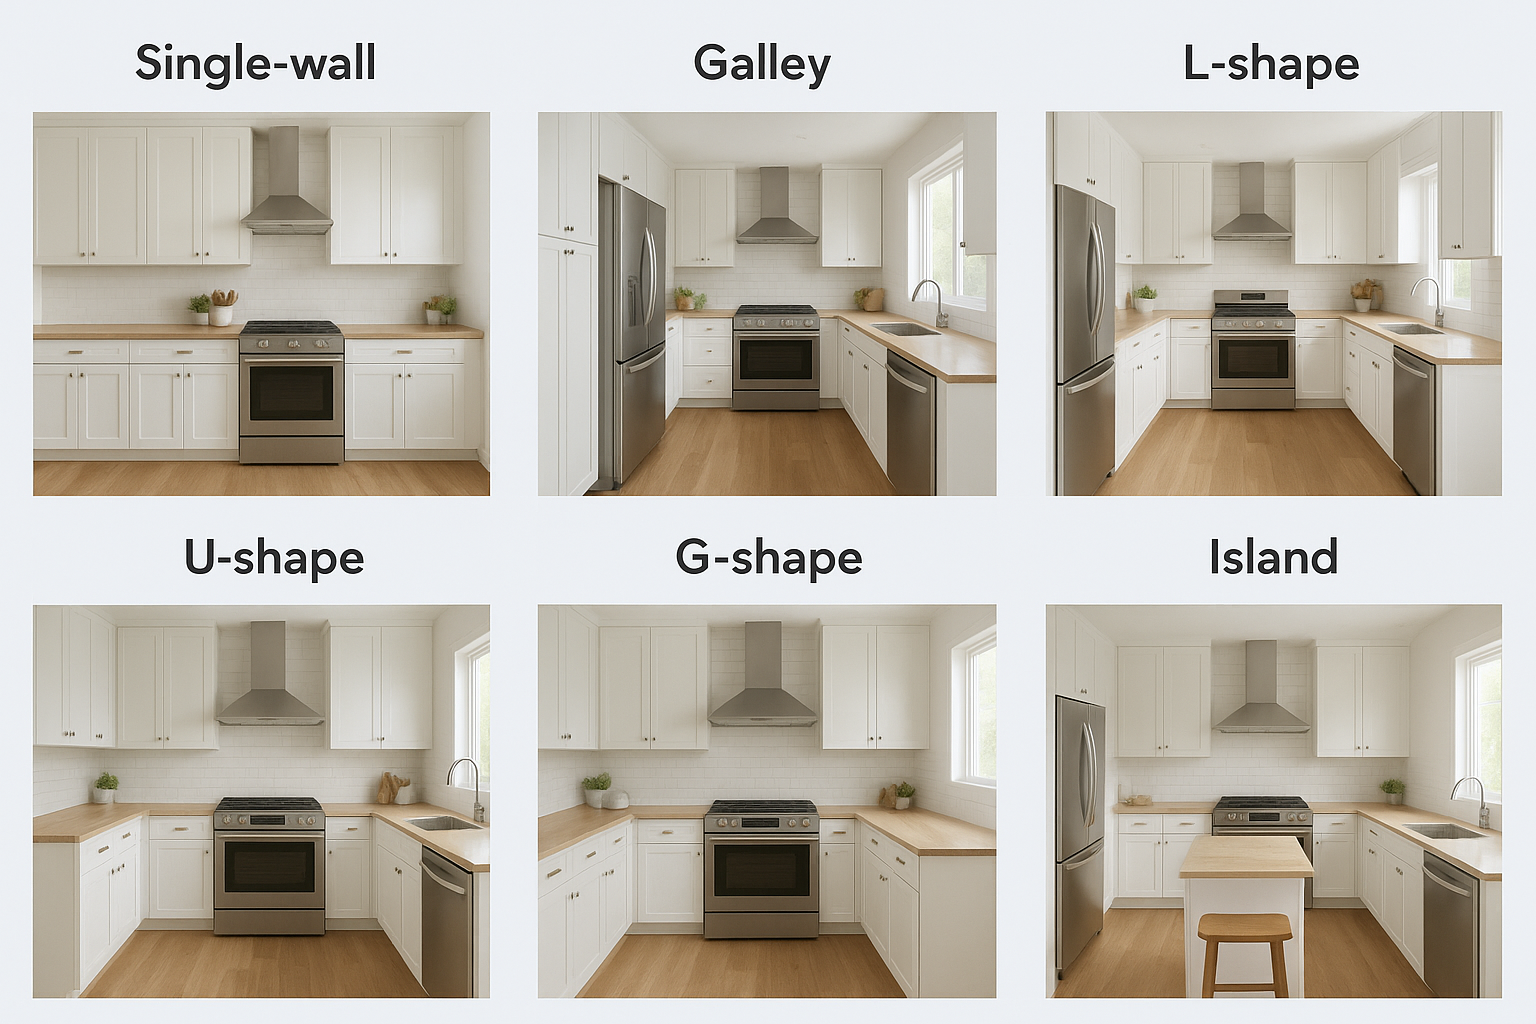
| Layout | Best For | Minimum Space Needed |
|---|---|---|
| Single-wall | Small apartments, open plans | 8 ft wall run |
| Galley | Efficient single-cook kitchens | 7-8 ft between walls |
| L-shape | Corner spaces, casual dining areas | 10×10 ft minimum |
| U-shape | High-volume cooking, multiple cooks | 12×12 ft minimum |
| G-shape | Large kitchens needing extra storage | 12×15 ft minimum |
| Island | Open floor plans with generous clearance | 42-48 in. clearance on all island sides |
The National Kitchen and Bath Association recommends at least 42 inches of clearance between parallel work surfaces for single-cook kitchens and 48 inches for two-cook households.
Match layout to your household’s cooking habits
Your layout choice should follow your daily workflow, not the floor plan you inherited. If two people regularly cook together, a U-shape or island configuration keeps each person in their own work zone without forcing constant crossing. If you cook solo and want maximum efficiency with minimal steps, a galley concentrates everything within arm’s reach.
Write out the three tasks you perform most often in your kitchen: for example, chopping at the counter, moving to the stove, then plating at a secondary surface. Then test each layout option by walking those three steps on your scaled floor plan. The layout that reduces total travel distance for your actual routine is the right one, regardless of what looks best in a design photo.
Step 5. Select cabinets, counters, and key finishes
Material selection is where budget pressure and design preference collide most directly. In any plan for how to plan a kitchen remodel, finishes represent your largest single spending category, so making these choices in the right order, cabinets first, then countertops, then secondary finishes, keeps everything coordinated and prevents costly returns.
Choose cabinets based on budget and build quality
Cabinets absorb 30 to 35 percent of a typical kitchen budget, which means the build quality you choose here has the biggest ripple effect on everything else. Stock cabinets are the most affordable option and ship in standard sizes, while semi-custom cabinets offer more sizing flexibility at a mid-range price. Full custom cabinets are built to exact dimensions, which matters most in kitchens with unusual wall angles or specific storage requirements.
Use this quick comparison to match cabinet type to your situation:
| Cabinet Type | Cost Range | Lead Time | Best For |
|---|---|---|---|
| Stock | $60-$200 per linear ft | 1-2 weeks | Standard layouts, tight budgets |
| Semi-custom | $150-$650 per linear ft | 4-6 weeks | Most residential remodels |
| Full custom | $500-$1,500+ per linear ft | 8-16 weeks | Non-standard spaces, high-end projects |
Order cabinets before you finalize countertop measurements, since counter templates require cabinet installation to be accurate.
Pick countertops that match your use and budget
Your countertop material should match how you actually cook, not just how the surface looks in a showroom photo. Quartz resists staining and heat better than marble and needs no sealing, making it the most practical choice for heavy daily use. Butcher block works well in prep-heavy kitchens but requires regular oiling to prevent cracking.
Coordinate finishes across the whole room
Once cabinets and countertops are locked in, pull your remaining finishes toward those two anchors. Your hardware finish, faucet, sink material, and backsplash tile should all draw from the same two or three tones already established by your cabinet color and counter surface. Write each confirmed finish into a single reference sheet and bring it to every supplier meeting so nothing conflicts when individual items arrive on site.
Step 6. Plan appliances, lighting, plumbing, and HVAC
Mechanical and appliance decisions directly affect how your cabinets, countertops, and layout get built out, which makes them a critical part of how to plan a kitchen remodel. Many homeowners treat appliances and lighting as choices they can finalize later, but your refrigerator depth, range width, and ventilation requirements all dictate cabinet sizing, wall clearances, and rough-in locations before a single cabinet gets installed.
Select appliances before cabinet dimensions are locked
Appliance dimensions drive your cabinet layout, so you need specific model specs confirmed before your cabinet order goes in. A standard refrigerator runs 30 to 36 inches wide, but a counter-depth model runs shallower and changes the cabinet run beside it. Your range width (30 or 36 inches) determines the base cabinet configuration on either side, and a built-in microwave requires a dedicated cabinet cutout framed to exact dimensions.
Lock appliance model numbers before finalizing cabinet orders, since even a one-inch width difference forces a cabinet revision.
Confirm three specs for every appliance before you commit to measurements: width, depth, and rough-in requirements (electrical circuit, gas line location, or water supply for refrigerators with ice makers). Add these numbers to your finish reference sheet alongside your cabinet and countertop selections so every trade contractor is working from the same information.
Map lighting zones before electrical rough-in
Kitchen lighting works in three layers: ambient overhead, task lighting under cabinets and over islands, and accent lighting inside glass cabinets or along toe-kicks. Decide which zones you want and where fixtures land before your electrician runs wire, because adding circuits after drywall closes costs significantly more than building them into the original rough-in plan. Mark each fixture location on your scaled floor plan and confirm switch placement with your electrician before framing is complete.
Confirm plumbing and HVAC positions early
Your plumber and HVAC contractor need finalized plans before any framing or drywall work begins. Moving a drain stack or gas line after walls close adds both cost and time. Confirm the sink location, dishwasher drain connection, and range hood duct path while walls are still open. HVAC vent placement should also coordinate with your upper cabinet layout so supply registers don’t get blocked by soffits or cabinet crowns.
Step 7. Map the timeline and remodel order
A timeline does more than track dates, it forces every trade contractor and material delivery to line up in the right sequence. One of the most practical aspects of how to plan a kitchen remodel is understanding that the order of operations is fixed. Work out of sequence, and you end up opening finished walls to run wire or retiling a floor that gets damaged by the next trade coming through.
Understand the correct order of operations
Demolition always comes first, followed by structural framing changes, then mechanical rough-ins (plumbing, electrical, HVAC), then inspections, then drywall, then cabinets, countertops, and tile. Appliances and fixtures go in last, after surfaces are finished and protected. This sequence exists because each phase depends on the previous one being inspected or fully dried before the next trade touches the space.
Scheduling a finish trade before rough-in inspections are approved is the single most common cause of project delays.
Flooring installation timing depends on your cabinet type. If you’re installing floating floors, lay them before cabinets go in. If you’re installing tile, most installers prefer to set cabinets first and tile up to them, which reduces material waste and grout line complexity at the base.
Build a week-by-week project schedule
Use the template below to map your specific project. Fill in start dates once your contractor confirms lead times for materials and subcontractor availability. A mid-range kitchen remodel with no structural changes typically runs six to ten weeks from demo to punch list. Full gut renovations with layout changes commonly run twelve to eighteen weeks.
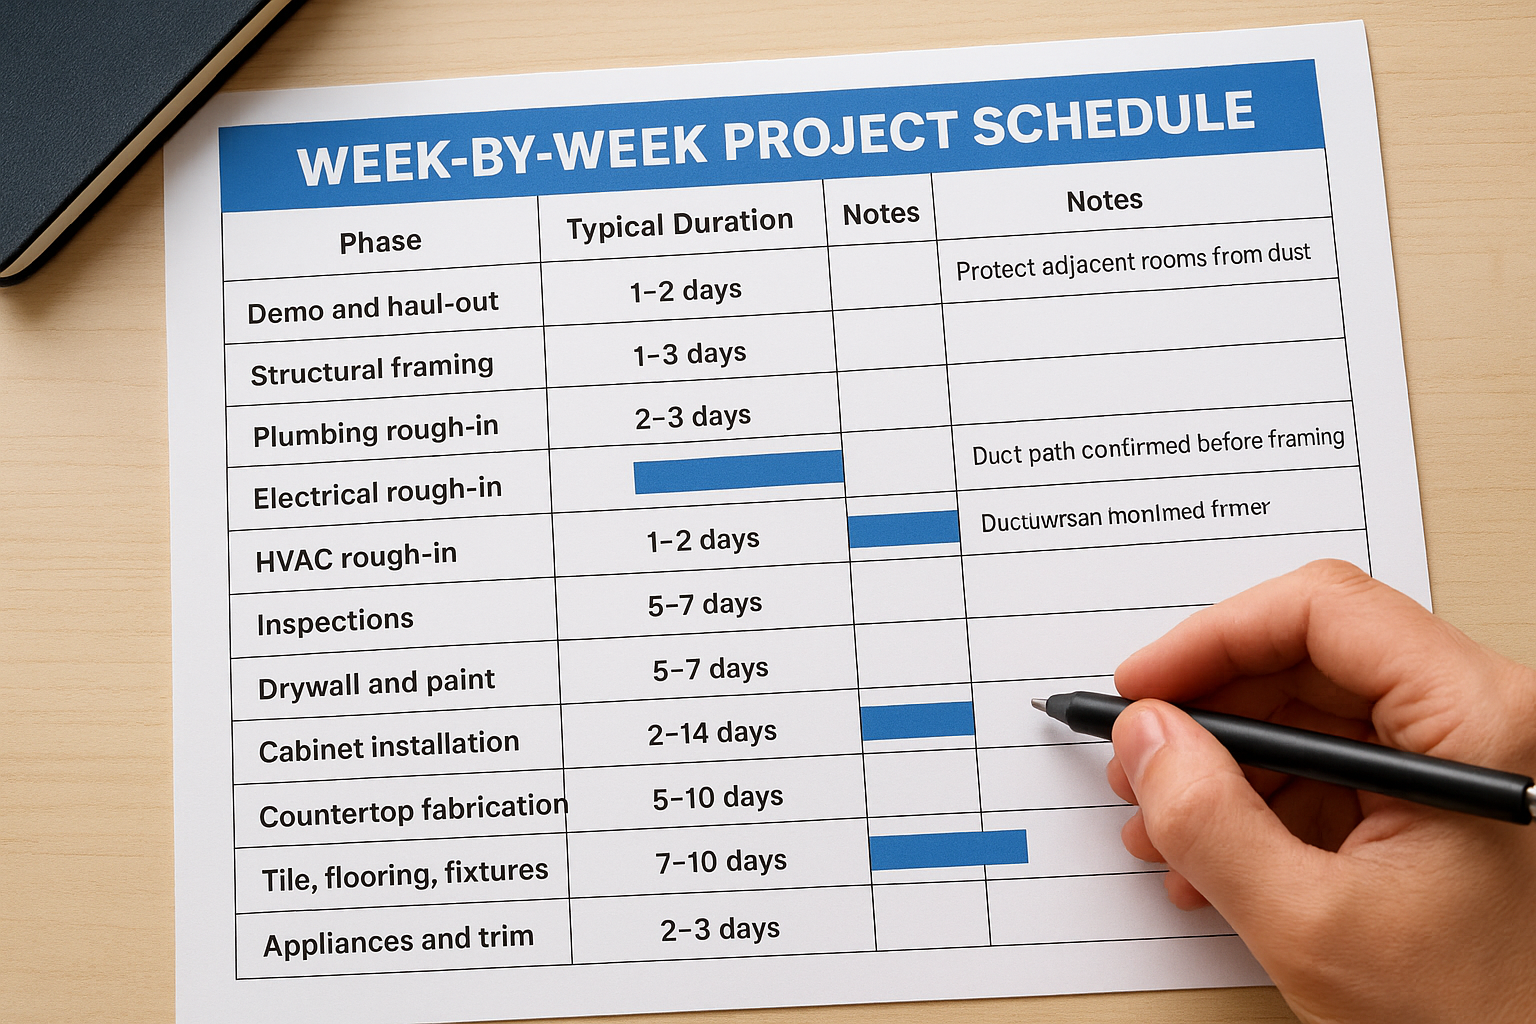
| Phase | Typical Duration | Notes |
|---|---|---|
| Demo and haul-out | 1-2 days | Protect adjacent rooms from dust |
| Structural framing | 1-3 days | Only if walls move |
| Plumbing rough-in | 2-3 days | Before drywall closes |
| Electrical rough-in | 2-4 days | Confirm fixture locations first |
| HVAC rough-in | 1-2 days | Duct path confirmed before framing |
| Inspections | 1-5 days | Schedule early, inspectors book out |
| Drywall and paint | 5-7 days | Includes drying time |
| Cabinet installation | 2-5 days | Countertop template follows |
| Countertop fabrication | 7-14 days | Off-site, confirm lead time upfront |
| Tile, flooring, fixtures | 5-10 days | Sequence with cabinet install |
| Appliances and trim | 2-3 days | Final punch list after install |
Step 8. Lock plans, permits, and contractor details
This is the last planning step before physical work begins, and it’s the one that protects everything you’ve built across the previous seven steps. Finalizing your plans, pulling required permits, and confirming every contractor detail in writing are not formalities you can treat as optional. Skipping any one of them creates gaps that cost real money when disputes arise or inspections fail mid-project.
Finalize your plans and pull permits
Before you schedule demo day, your complete set of drawings, specifications, and material selections needs to be locked in one document. That means cabinet layout, appliance specs, finish selections, lighting plan, and any structural or mechanical changes all confirmed and dated. If anything is still listed as "TBD," it will become a change order once work starts, and change orders always cost more than decisions made upfront.
Most full kitchen remodels require building permits, especially if your scope includes electrical circuit additions, plumbing relocations, or structural wall changes. Your local building department will tell you exactly which permits apply to your scope. Pull them before work starts, because unpermitted work can trigger fines, failed home sale inspections, and insurance complications down the road.
Confirm permit requirements with your local building department before signing any contractor agreement, since permit fees and timeline affect both your budget and schedule.
Vet and confirm your contractor
Knowing how to plan a kitchen remodel only pays off if the contractor executing the work is qualified and locked in with clear terms. Verify that your contractor carries current general liability insurance and a valid state contractor’s license before you sign anything. In Washington State, you can confirm license status through the Department of Labor and Industries online lookup.
Your contractor agreement should include the full project scope, a payment schedule tied to milestones rather than dates, a list of all subcontractors, and a process for handling change orders. Use this checklist before signing:
- Scope of work written out in full, not summarized
- Payment tied to project milestones
- Start date and estimated completion date confirmed
- Change order process defined in writing
- Permit responsibility assigned to one party
- Warranty terms for both labor and materials stated clearly
Plan your next move
You now have a complete framework for how to plan a kitchen remodel, from nailing down your scope and budget through locking in permits and contractor terms. Every step in this guide builds on the one before it, so the time you invest in early planning directly determines how smoothly everything from demo day through final punch list actually goes.
The next concrete move is to take your measurements, build a budget with a real contingency buffer, and start the contractor conversation with a written scope already in hand. Homeowners who get the best results are the ones who show up prepared with specific numbers and clear priorities, not the ones who work it out as construction gets started.
Ready to work with a team that manages the full process from planning through punch list? Connect with Turning Point Ventures to talk through your project scope and build a plan that holds up from day one.


0 Comments